How to Build a Home Renovation Budget That Holds Up Once Work Begins

A kitchen remodel quoted at $45,000 typically ends up costing $52,000 to $58,000 by the time the crew leaves, and the gap almost never comes from the contractor padding the bill. It comes from decisions made after demolition starts: a water-damaged subfloor nobody could see until the old tile came up, a switch from laminate to quartz counters, an extra outlet added because the electrician is already there. A realistic budget accounts for these things before they happen instead of reacting to them in week three.

Start With the Real Number, Not the Wish Number

Most homeowners begin by pricing the renovation they want, then get sticker shock and start cutting corners to make it fit their savings. Reverse that order. Decide what you can actually spend, in cash or financing you’re approved for, and treat that as the ceiling before you look at a single tile sample.

National averages help set expectations, though local labor rates swing them 20% to 40% in either direction. As of recent industry data, a midrange bathroom remodel runs $12,000 to $25,000, a midrange kitchen runs $30,000 to $60,000, and a two-story addition runs $200 to $400 per square foot depending on foundation type and finish level. Call three local contractors for ballpark ranges on your specific project before you commit to a number. A phone estimate isn’t a quote, but it tells you whether your target is in the right zip code.

Break the Budget Into Categories That Actually Matter

A single lump sum (“$40,000 for the kitchen”) gives you nothing to check progress against. Split it into categories so you can see where money is actually going and catch overspending in one area before it eats the whole project.

  • Materials: cabinets, countertops, flooring, fixtures, paint, hardware
  • Labor: demolition, framing, plumbing, electrical, drywall, finish carpentry
  • Permits and inspections: often 1% to 3% of total project cost, varies by municipality
  • Design and planning: architect or designer fees if you’re using one
  • Contingency: covered in detail below
  • Living expenses during construction: takeout, storage unit rental, temporary housing if the kitchen or only bathroom is out of commission

That last category gets skipped constantly. If your only bathroom is being gutted for three weeks, a hotel or short-term rental cost is a real line item, not an afterthought.

Build a Contingency Fund and Leave It Alone Early On

Set aside 15% to 20% of the total project cost for older homes (anything built before 1980, especially before 1950) and 10% to 15% for newer construction. This money exists for the problems you can’t see during the estimate phase: outdated wiring that doesn’t meet current code, rot behind a wall, plumbing that was never actually to code despite passing a prior inspection.

The discipline part is not spending it on upgrades. If you find yourself dipping into contingency funds for a nicer faucet or a nicer light fixture in week one, you won’t have anything left when the plumber finds galvanized pipe that needs replacing in week four. Track contingency spending separately from your main budget so you always know what percentage is left and what it’s earmarked for.

Get Multiple Bids and Compare Line Items, Not Totals

Three bids that come in at $38,000, $41,000, and $52,000 tell you almost nothing on their own. The useful information is in what’s included. One contractor’s $38,000 bid might exclude permit fees, use a builder-grade allowance for cabinets, and assume you’re handling demolition yourself. The $52,000 bid might include all of that plus a two-year warranty on labor.

Ask every contractor for an itemized breakdown, not a single total. Compare the same line items across bids: cost per linear foot of cabinetry, cost per square foot of flooring, hourly labor rates, and what allowance is built in for fixtures. Allowances matter more than people expect. A $2,500 allowance for a bathroom vanity sounds fine until you tour showrooms and realize the vanity you actually want costs $4,200.

Also ask what happens if the project runs long. Some contracts include a daily rate for delays caused by the contractor, others don’t address it at all. Get this in writing before signing.

Track Spending Weekly, Not Monthly

Renovations move fast once they start, and a monthly review often means you’ve already overspent by the time you notice. A simple spreadsheet with columns for budgeted amount, actual amount, and variance, updated every Friday, catches problems while there’s still time to adjust.

Pay attention to variance patterns, not just single overruns. If materials keep coming in 8% over budget every week, that’s a sign your original estimates were too optimistic across the board, and you need to either find savings elsewhere or increase the total budget now rather than in the final week when there’s no flexibility left.

Keep every receipt and change order in one folder, digital or physical. When a dispute comes up about what was agreed to, the paper trail settles it faster than a phone call to a contractor’s memory of a conversation from six weeks ago.

Next step: before you contact a single contractor, write out your three numbers on paper: total ceiling budget, contingency amount set aside from that ceiling, and the maximum you’re willing to spend per category. Bring that sheet to every bid meeting. It keeps the conversation grounded in your numbers instead of theirs.

Related articles: Flooring Types – A Look at the Different Types of Flooring · The 7 Most Important Things General Contractors in Albany NY Need to Know · Choosing Flooring by Room: A Traffic and Moisture Guide That Actually Works

What a General Contractor Actually Does, and When You Need One

A general contractor manages the people, materials, permits, and schedule for a construction project, but rarely swings a hammer themselves. Their job is coordination: hiring and supervising subcontractors, ordering materials, scheduling inspections, and making sure the electrician isn’t showing up before the drywall is finished. For a homeowner, the value is not in the labor. It’s in not having to manage twelve different vendors and a permit office by yourself.

The actual daily work

On a mid-size renovation, a general contractor’s week looks less like construction and more like project management. They walk the site two or three times, check that framing matches the plans, confirm the plumber has the right rough-in measurements before drywall goes up, and call the building inspector to schedule the next required inspection. They track a budget spreadsheet, adjust for change orders (a client deciding to move an outlet costs $75 to $150 in most markets, and it adds up), and handle the paperwork that keeps a project legal.

They also absorb scheduling risk. If a tile order gets delayed three weeks, a good contractor shifts other trades around so the whole job doesn’t stall. If a subcontractor no-shows, the contractor finds a replacement instead of the homeowner scrambling to find a plumber on a Tuesday afternoon.

When you actually need one

Not every project needs a general contractor. A bathroom refresh with new paint, a vanity swap, and new fixtures can often be handled by hiring a plumber and a painter directly. The threshold usually shifts once a project involves more than two or three trades working in sequence, or once it requires a permit.

  • Kitchen remodels involving moved plumbing or gas lines, new electrical circuits, and cabinetry: almost always worth a general contractor.
  • Room additions or anything touching the foundation or roofline: a general contractor is standard practice, and most jurisdictions require a licensed one to pull permits above a certain project value (often $5,000 to $10,000 depending on the state).
  • Whole-house renovations: managing this without a contractor means becoming a part-time project manager for six months to a year.
  • Structural changes, like removing a load-bearing wall: this requires an engineer’s sign-off and a contractor who knows how to sequence temporary shoring, framing, and inspection.
  • Single-trade jobs (new roof, new water heater, replacing windows): usually cheaper and simpler to hire that specialist directly.

A rough rule some contractors use themselves: if the project involves three or more trades and takes longer than two weeks, coordination costs more in stress and delays than a contractor’s fee would.

How they get paid and what that means for cost

General contractors typically charge in one of three ways: a flat fee for the whole project, cost-plus (materials and labor costs plus a percentage, usually 10% to 20%), or time and materials for smaller or less-defined jobs. On a $50,000 kitchen remodel, a 15% markup means roughly $7,500 goes to the contractor’s overhead and profit, on top of what subcontractors and materials cost.

That fee isn’t padding. It covers liability insurance, workers’ compensation coverage for anyone they employ directly, the time spent managing the schedule, and the risk they take on if something goes wrong. A contractor who quotes suspiciously low, say 5% over cost, is either inexperienced, underinsured, or planning to make up the difference somewhere else, often through change orders later in the project.

Get at least three bids for any project over $10,000. Compare them on scope, not just the bottom-line number. A $42,000 bid and a $48,000 bid might look different until you notice one includes permit fees and dumpster rental and the other doesn’t.

Vetting one before signing anything

Licensing requirements vary by state, and some states (like Missouri) don’t require a general contractor license at all, which makes vetting more important, not less. Check for:

  • A current license number, verifiable through the state licensing board’s website.
  • General liability insurance and workers’ compensation coverage, with certificates provided directly by the insurer, not just a photocopy from the contractor.
  • At least three references from projects completed in the last two years, ideally similar in scope to yours.
  • A written contract specifying start and completion dates, payment schedule tied to milestones (not just calendar dates), and a defined process for change orders.

Avoid any contractor who asks for more than 10% to 30% upfront before work begins (state law caps this in some places, including California at 10% or $1,000, whichever is less). Payment should follow progress: a deposit, then payments tied to completed phases like framing, rough-in, and final walkthrough.

What good communication looks like

A contractor worth hiring sets expectations early: a written schedule with rough dates for each phase, a clear point of contact if something goes wrong on site, and regular updates, whether that’s a weekly walk-through or a shared project app. Delays happen on almost every project, material lead times shift, inspectors get backed up, weather interferes with exterior work. The difference between a good contractor and a bad one is usually not whether delays happen, but whether you hear about them before or after they cause a problem.

Ask upfront how they handle change orders in writing, how often they’ll update you, and who physically supervises the site day to day. If the answer is “I’ll swing by when I can,” that’s worth weighing against a contractor who has a dedicated site supervisor or project manager on jobs over a certain size.

If you’re weighing whether to hire one, start by listing every trade your project will require and every permit it will need. If that list runs past two trades or includes anything structural, electrical panel work, or gas lines, call three licensed general contractors this week, ask for itemized bids, and check their license status before any conversation about price.

Related articles: How to Build a Home Renovation Budget That Holds Up Once Work Begins · Flooring Types – A Look at the Different Types of Flooring · The 7 Most Important Things General Contractors in Albany NY Need to Know
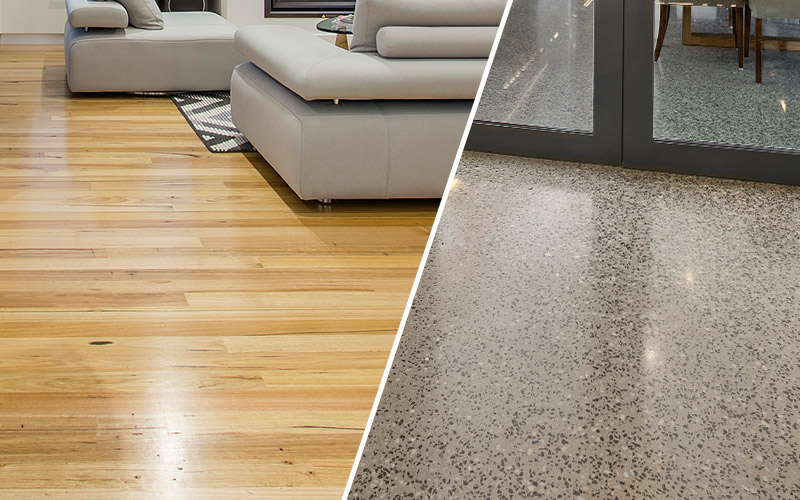
Choosing Flooring by Room: A Traffic and Moisture Guide That Actually Works

Flooring failures rarely come from picking an ugly color. They come from installing the wrong material in a room that gets wet, gets scuffed by 40 footsteps a day, or sits over a slab with no vapor barrier. A $6-per-square-foot laminate in a mudroom will cup and swell within two years. A $12-per-square-foot engineered hardwood in a bathroom will do the same. The fix isn’t spending more money everywhere. It’s matching material properties to what each room actually does to a floor.

Start With Moisture Exposure, Not Aesthetics

Every room falls into one of three moisture categories: dry (bedrooms, living rooms, closets), occasional wet (kitchens, laundry rooms, entryways), and constant wet (full bathrooms, basements, mudrooms in snow regions). Solid hardwood and laminate belong almost exclusively in the dry category. Both are made from wood fiber that swells when it absorbs water, and once boards cup or the core delaminates, there’s no repair, only replacement.

Porcelain tile, luxury vinyl plank (LVP), and sheet vinyl handle constant wet exposure without structural damage. Waterproof rated LVP (look for a rigid core, sometimes labeled SPC or WPC) can sit in standing water for hours without swelling, which matters if a washing machine hose fails or a kid leaves the bathtub running. Engineered hardwood sits in the middle: it tolerates humidity swings better than solid wood because of its cross-layered construction, but it still isn’t rated for direct water contact.

Match Traffic Level to Wear Ratings

Flooring manufacturers rate durability using the PEI scale for tile (Porcelain Enamel Institute) and AC ratings for laminate.

  • PEI 1-2: wall tile or very low traffic areas only.
  • PEI 3: suitable for residential floors with light to moderate foot traffic (bedrooms, dining rooms).
  • PEI 4-5: rated for heavy residential and light commercial traffic (kitchens, entryways, hallways).
  • AC1-AC2 laminate: bedrooms and low-traffic rooms.
  • AC3-AC4 laminate: kitchens, living rooms, and homes with pets or kids.

A hallway connecting a garage to a kitchen sees far more abrasion than a guest bedroom, even in the same house. That hallway needs PEI 4 tile or AC4 laminate at minimum, not the PEI 3 option that looked identical in the showroom.

Room-by-Room Recommendations

Entryways and mudrooms take grit, salt, and standing water off shoes. Porcelain tile or waterproof LVP with a textured, slip-resistant finish works best. Skip anything with a high-gloss finish here; wet grit turns it into a slip hazard.

Kitchens see grease, dropped pans, and dishwasher or sink leaks. Porcelain tile, waterproof LVP, or sealed engineered hardwood with a site-applied polyurethane top coat all perform well. Solid hardwood can work if you’re diligent about wiping spills immediately and using a rug at the sink, but it’s the riskiest choice in this room.

Bathrooms need full waterproofing at the seams, not just a water-resistant surface. Porcelain or ceramic tile with epoxy grout, or sheet vinyl with heat-welded seams, keeps water from reaching the subfloor. Avoid click-lock LVP in bathrooms unless the manufacturer specifically rates it for wet installation with sealed edges, since standing water can seep into the seams over time.

Bedrooms and living rooms carry the lowest moisture risk and moderate traffic. This is where solid hardwood, engineered hardwood, and carpet make the most sense, since none of them need to withstand spills as a design requirement. Carpet with a stain-resistant treatment and a density rating above 3,000 (check the label for face weight and twist level) holds up well in family rooms with kids or pets.

Basements combine high moisture risk with variable temperature. Vapor can rise through concrete slabs even in finished basements, so solid and engineered hardwood are poor choices regardless of how dry the room feels day to day. Waterproof LVP installed over a vapor barrier, or porcelain tile, are the two materials that consistently hold up in below-grade spaces.

Mistakes That Shorten a Floor’s Life

The most common error is buying based on the showroom sample rather than the room’s actual conditions. A sample board sitting under store lighting tells you nothing about how a material handles 90% humidity in a bathroom or de-icing salt tracked in from a driveway.

The second common error is skipping a moisture test before installing over concrete. A calcium chloride test or in-situ relative humidity probe, run by the installer before flooring goes down, tells you whether the slab is dry enough for the chosen material. Installing hardwood or laminate over a slab reading above 75% relative humidity is a near-guaranteed callback within 12 to 18 months.

The third is ignoring transition strips between rooms with different moisture levels. Water from a bathroom or kitchen migrates along grout lines and under baseboards if there’s no barrier at the doorway. A proper transition strip, plus a bead of silicone caulk at the threshold, stops that migration before it reaches an adjacent wood floor.

Underlayment and Subfloor Prep Matter as Much as the Surface Material

A vapor barrier underlayment (6-mil polyethylene sheeting at minimum) under LVP or laminate in any room with moisture exposure protects the flooring from below, not just above. In bathrooms and kitchens, cement backer board under tile, rather than plywood alone, prevents the subfloor from absorbing splashes and softening over years of use. Skipping backer board to save $200 on a 100-square-foot kitchen is the single most common reason tile grout cracks within five years.

Before ordering any material, walk each room and note three things: how often it gets wet, how many people cross it daily, and whether it sits on a slab or a wood subfloor. Bring those notes to a flooring supplier and ask for the PEI or AC rating and moisture rating for each product you’re considering, in writing. That single conversation prevents most of the callbacks and replacements that cost homeowners far more than the flooring itself.

Related articles: What a General Contractor Actually Does, and When You Need One · How to Build a Home Renovation Budget That Holds Up Once Work Begins · Flooring Types – A Look at the Different Types of Flooring

The 7 Most Important Things General Contractors in Albany NY Need to Know

With the average home costing more than 10 times the average yearly salary to own, it’s no wonder that homeowners now see their homes as an investment rather than just a place to live. Let’s take this view one step further and consider your home as a business: What are the financial implications of owning a home rather than renting? Are there ways you can optimize your finances and make the most of your investment? And if you’re thinking about becoming a contractor, understand that you have some big challenges ahead as a contractor. On this blog, we explore why contractors face challenges in their field, how to succeed as a contractor, and what you need to know before getting into contracting as your career path.

What are the financial implications of being a contractor?

There are many ways to save money being a contractor. For example, contractors typically have access to tax deductions and job-related expenses that renters cannot claim. Contractors also have a built-in way of saving by not paying for rent or mortgage. You can actually make more money than you could as a homeowner if you invest wisely and choose the right clients. And, even if your business is slow to start, you can use your contractor skills elsewhere in other businesses. For instance, contractors often work in construction or remodeling industries after completing their work with homeowners. This allows them to gain experience in other fields before getting into contracting full time

Getting a contractor’s license is difficult and expensive

When you want to become a contractor, the first thing you will need is a contractor’s license. Getting that license does not come easy, and it’s expensive. In order to get the license, you will need to meet specific requirements that vary from state to state. And if you have any criminal background, going through this process can be all but impossible. Contractors who are just beginning their careers stand out as potential risks in the eyes of insurance companies because they may not have experience handling large sums of money legally. Insurance companies also worry about whether or not contractors will have the right financial backing when they start up their own business. And once they do get started, their business could fail due to inadequate income or insufficient resources for certain projects and materials required for workmanship on those projects. The licensing process can seem like one failure after another, but these challenges are worth overcoming in your pursuit of success as a contractor.

Risks, difficulties and barriers to entry for contractors

Contractors face many challenges and risks as they plan their journey into the industry. One of the primary obstacles is the difficulty in finding work. In order to find work, contractors must be able to compete for jobs, which means having a competitive edge (with more experience or a higher salary) over other potential contractors. Additionally, contractors need to understand regulatory requirements and guidelines in order to stay within legal boundaries. The most significant barrier that contractors face is the lack of opportunities for learning and development: when it comes to general contractors Albany NY doesn’t have access to these resources while they are new to the industry or when they want to improve their skills with supplemental education, much unlike the larger cities. This can inhibit contractors from meeting the needs of their clients because they don’t have what it takes in terms of knowledge or experience. And finally, there’s a lack of workplace safety regulations and standards that apply specifically to construction workers in general. One reason is that regulations are typically brought up at large-scale jobsites rather than on individual projects. You also might not be aware of what you should be doing as a contractor if you haven’t been given specific instructions from your client or owner during your first day on site.

The difficulty of finding good quality work for contractors

Contractors face a lot of challenges when they venture into their career. One of the biggest challenges is finding quality work that pays well. This is where you have to be creative and use your resources to find good clients. It’s not easy, but it’s worth it when you get the job. One way to find quality work for contractors is through social media advertising. You can use Facebook ads to promote your services as a contractor, which will help you get more exposure and more clients. Another way is by doing SEO for your business on Google, which will allow you to reach potential clients from all over the world who are interested in contracting services.

Why are so few contractors successful?

Most contractors face a unique set of challenges that are not required in other fields. These include having to deal with the unpredictability of your contract work, being able to keep up with new technologies and materials, and ensuring that you can match your personal skill set to what you’re doing. Contractors also have to be resourceful because they’re often on their own and don’t have the benefit of working from a boss’s office. It’s not easy being your own boss and contractor. A key takeaway is that contractors need to focus on building relationships with their customers and making sure they deliver quality work at an expected cost with an acceptable timeline.

The 7 things you need to know before becoming a contractor

Contracting can be a lucrative career path, but you need to be prepared for the challenges. Contractors face challenges in their field because they often work with limited budgets, which gives them less control over prices. Contractors also have to address more regulations than businesses in other industries. In addition, contractors may not enjoy the benefits that business owners enjoy such as health insurance and retirement plans. In contrast, contractors are rewarded for their work with money. Additionally, contractors sometimes have to deal with competitors who try to undercut prices on their services. For example, if you’re working with a new client who wants a kitchen remodel or bathroom remodel, there could be someone else on the market offering the same service at a lower price than you’re offering it. But don’t let these challenges deter you from considering contracting as your career path! You’ll find that there are many benefits of being a contractor that business owners don’t experience (like flexibility in hours and payment). It’s important to know what those benefits are before choosing this career option!

Do you need to be an expert in certain fields to be a contractor?

Contractors have to be experts in certain fields, such as plumbing or electrical work. Contractors also need to be able to provide services that are needed in a given area. For example, if you’re getting into house painting, you need to know how to paint walls and ceiling surfaces. But if you’re dealing with gutters and downspouts, your expertise might not be in painting at all; instead, it might be more about fixing the problem.

Learn more about becoming a contractor

Contractors face some unique challenges, but the most important thing you can do as a contractor is to learn more and start educating yourself. Contracting offers many financial perks and opportunities, and it’s necessary to educate yourself on the field in order to make the most of your business. You also need to understand what your goals are as a contractor. If you plan to become a contractor one day, consider how much time you want to spend on that career path each year. As companies look for contractors with experience and expertise, be sure that you’re able to establish those credentials before taking on the position of contractor. In terms of education, contractors should take advantage of online courses from places like Udemy or Coursera to learn about contracting basics. Additionally, read books like The Millionaire Real Estate Agent by Gary Keller or Contractors: How To Make A Fortune Selling Your Services by Darren Ivey in order to gain an understanding of what it means to be a contractor.

Related articles: Choosing Flooring by Room: A Traffic and Moisture Guide That Actually Works · What a General Contractor Actually Does, and When You Need One · How to Build a Home Renovation Budget That Holds Up Once Work Begins

Flooring Types – A Look at the Different Types of Flooring

Flooring Types – A Look at the Different Types of Flooring

Choosing a type of flooring can be a daunting task. There are several varieties – wood, ceramic, stone, vinyl, carpeting, and many specialty materials. Within each broad category, there are hundreds of choices. Fortunately, narrowing them down is a simple matter of attending to a few basic guidelines.
For most, especially do-it-yourselfers who are strongly motivated to save money, budget is the first consideration.

Carpet is often the least expensive option, but many low-cost vinyl floorings will allow homeowners to pinch pennies as well. The difficulty here is that you often get what, and no more than, you pay for. A cheap carpet doesn’t just look cheap, it is cheap, which means poor quality. Ditto vinyl.

That means that many desirable qualities like durability and ease of cleaning are often absent. If the material has to be replaced every couple of years is it worth the price? If you have to spend inordinate amounts of time cleaning carpets with low stain resistance, are you saving much? The answers will depend, of course, on individual circumstances, including application. Some areas, such as basements, may not warrant more expensive options.

Hardwood is fairly expensive, but it has excellent durability, is easy to care for, and looks outstanding. But not everyone can afford Brazilian Teak or Chinese Cherry. One option is a laminate. They can often be quite attractive and they last for years. Their wear characteristics aren’t quite as good as hardwoods, which can easily last 50 years if well cared for. But they do quite well and they’re pleasant to walk on.

If investigating a laminate, look for the AC rating. These are assigned based on careful testing and represent the durability of the material, resistance to staining and scratching, and other measures. AC 1 laminates are suitable for moderate traffic areas, while AC 3 will stand up better to heavy use. The higher the better, but AC 5 is generally only needed and used in public buildings.

Ceramics run the gamut from cheap tile to highly expensive. One difference is how durable the tiles are. All ceramics have very hard surfaces, but some tiles are more brittle than others. That means that, under normal use, they are more likely to crack. If a tile has to be replaced often, which is costly and time-consuming, it might be worthwhile to spend a little more upfront.
Stone tends to be on the more expensive end of the choices, but of course, it may well outlast the house. Many are removed from old houses being torn down and re-used elsewhere. If you’re looking for something stylish and ultra-durable, a good sandstone or slate might be just the thing. With modern treatments, they’re generally stain resistant and can be easy to care for.

One of the least expensive, but today very stylish choices is concrete. Once relegated to basements, with modern surface effects they can be stained with a variety of colors and designs. They can emulate marble, stone, or even wood. They clean easily and, of course, will last for decades without cracking. That makes them great for any area.

Consider your budget, wear needs, and potential traffic, and throw in your aesthetic desires. Very quickly, you’ll be able to narrow the choices.

Related articles: The 7 Most Important Things General Contractors in Albany NY Need to Know · Choosing Flooring by Room: A Traffic and Moisture Guide That Actually Works · What a General Contractor Actually Does, and When You Need One